Pretty little things for the wedding of my dreams...

Tuesday, March 27, 2012

Charming Crowns (Stefana) for the Wedding Ceremony

As part of our ceremony, I decided to incorporate a crowning ceremony to recognize my fiance's Armenian heritage.   During the ceremony, weddings crowns are placed upon the heads of bridegroom and the bride.  Crowns worn by bride and groom are symbols of their own little kingdom or home.  Although our ceremony is going to be secular, I modified the ceremony as such to still incorporate the crowning.  However, to do all this I will need crowns! 

In the Greek tradition, the crowns are called "Stefana" and very common.  They can be made of metal, wood, ribbons and pearls.  Usually they are connected in the back with a long ribbon.  I began my search online and came upon some examples:

This one is available for 190 Euros here.


This one is available for $72.00 here.


This one is available for $175.00 here.
As you can see, these crowns are NOT cheap! So, I decided to make my own and there really were not many ideas online.  I found a tutorial for making a Christmas ornament out of an embroidery hoop and that's what gave me the idea for this project. 

1.) I purchased two embroidery hoops (about $1.25 per hoop), and you should see which fits your head best. 

I also purchased ribbon from Michael's which I got on sale for $1.00 per spool, make sure you have at least 8 yards of your first layer of ribbon.  Any additional layer of ribbon can come in 6 yards or less, depending how you wrap.  Here are the ribbons I used for the second and third layers ($1.00 each!):


I already had little pearl adhesive stickers from Michael's and a hot glue gun. 

2.) Then, I separated the inner part of the embroidery hoop (took off the part with the metal latch and kept the inside hoop with no latch). 
3.) For both crowns, I used only the inside hoop (no latch).  I began to slowly wrap the hoop in ribbon.  I put just a small line of hot glue on the inside of the hoop (no more than an inch)  because hot glue dries quickly.  Then, I slowly wrapped my first layer of ribbon on top of the glue, and made each piece of ribbon overlap. 

4.) After I completely wrapped each crown with my base layer ribbon.  I began to add some sparkly metallic ribbon in larger circles using the same method of glueing as before.

5.) When I was finished I had wrapped the crown completely with three different ribbons, two of which (the sparkly ones) were sort of intertwined (see below).  There was excess ribbon hanging off a small portion of the crown as well.

6.)  Then, I set about making the back bow and the ribbon connecting the two crowns.  First, I took the ribbon I wanted to use to connect the two crowns and glued one end to the inside of the crown at the same point where I had excess ribbon.
7.)  Then I took the excess ribbon which was hanging off the crowns (it was not the base layer, but one of the sparkly layers).  I glued it into a bow. The picture below isn't the greatest, but you should be able to see the connecting ribbon glued into the inside and the bow on the outside of the crown.
8.) I then pulled one of the sparkly ribbons over the front of the glued bow (like the knot) and I had an almost finished product.  I decided to add some embellishments by glueing on the little adhesive pearls I had around the crown and on the bow.  


9.) Here's what I came up with for a total of about $5.00 (depends on if you have the glue gun/glue and stickers).

Wednesday, March 21, 2012

Be Sure to Wear Flowers in your Hair...

           For my wedding ceremony I'm wearing a veil.  However, at the reception I wanted to wear a flower in my hair.  I have peonies in my bouquet and thought a pretty peony in my hair would be perfect.  Plus, I'm wearing ivory pearls.  So, I started by looking on etsy, there are lots of options, but some of them seem pretty expensive and I thought i could tackle this project.  Here's an example of a bridal hair flower on etsy that is $82.03.  It's beautiful, but pricey!

My Inspiration!
              To get started I needed some supplies.  I purchased or had the following: 1) A large peony silk flower(got it on sale for about $2.50 at Michael's); 2.) A hot glue gun (already had); 3.) A sewing kit with a needle, thread and scissors ($1.00 at the dollar store); 4.) a single square piece of ivory felt ($0.25 at a fabric store); 5.) A hair comb ($0.25 at a fabric store);  6.) Some light pink tulle (I got it in the extra pieces box at the fabric store for about a $1.00); and 7.) Some matches or a lighter.
              I also got a couple different pearl options for the center of the flower including some pearl beads (which you can see in the picture above) and some pearl buttons which are below.
                        To start, I dismantled the peony by taking off each petal and separating them (you can see how I did that above).  Then, to make the peony the right size for my head I picked the petal that I felt was a good size and folded any larger petals in half.  Then for each layer I pinned those larger petals to the right sized petals.  It looked like this:
           Next, I used a basic back stich to sew the petals together around the center of the flowers using my needle and ivory thread.  Then removed the pins. 
           For the next layer, I decided to incorporate some tulle.  I took my piece of tulle and cut a circle as best I could to fit the flower size.  Whenever you cut tulle you almost certainly get jagged edges.  So, I carefully lit a match and held the edge of the tulle over the match just for a milli-second.  This sealed the edges of the tulle and made it curl up in a really pretty way! Below you can see the tulle curled up and sealed before I put it on the flower.  Then I put another flower petal on top of the tulle and  pinned them together.  Then, I sewed the new layer of tulle and petal to the flower I'd already assembled by stitching them together in the middle.

         I followed the same pattern for each layer of petal and tulle.  As the flower began to form, it took a great shape because it curled in more and the tulle added just a touch of light pink.  Here's an example of the flower about 1/2 way done and a close-up of the inside stiching.

       Once I'd finished this step, the flower looked like this:

       Next, I cut a square of felt that was the size of my hair comb.  I hot-glued the felt to the hair comb's edge, and then sewed it just to be certain it would stay.
       After this, I attached the comb with hot glue and stiching to the back of my prepared flower.  I threw in a piece of tulle at the back to make the flower fold in even more.
        Now, I was ready to finish the pearly middle of the flower.  I'm pretty sure you could do the pearls first and the comb last, but I actually used the felt to sew my pearl buttons into the middle.
       Like I said, I wasn't sure if I should use a pearl buttons or beads.  I went with the buttons and they seemed to work just fine.  I sewed each pearl button into the center of the flower until the stiching in the middle was covered up, and I pulled the thread all the way through the felt in the back.  Then, just to be sure, I put just a little bit of hot glue under the pearl buttons on the top to keep them in place and secured to the center of the flower (buttons can move a little). 
       Here's the final result - the perfect ivory and pink tulle hair flower for me!
Here I am modeling my new hair flower, not the most gorgeous of backdrops (my bathroom) but it works!

The final product!
   

Monday, March 19, 2012

No Loss When You Emboss!

          Embossing is a method of elevating either images or letters from the face of a surface using pressure and heat.  There are many methods of embossing, I'm going to use the heat method in this blog which results in a raised letter or symbol with a smooth hard finish. This is still a work in progress because I'm thinking about more ways to use embossing in my wedding (because it's so fun!).  So far, I've decided I can emboss the backs of my wedding invitations with an "S" or another symbol to function as an envelope seal in place of expensive and messy wax seals.   Here's how I did it:

        First, embossing requires a few specialized, but inexpensive tools.  Here's what I bought to get started:

1.)  An Embossing Gun:  This is a heat gun which I found at Michael's for $9.00.   You can use a toaster or a stove if you are careful.  Here's the label:  
2.)  Embossing Powder:  There's many different kinds of powders.  You want to buypowders you can use for heat embossing (not dry embossing or other types).   At Michael's you can find both sparkly and matte powders.  Here's an example of one of the powders I bought:
3.)  Embossing Stamp Pad:  I learned that embossing ink is NOT like regular ink because it's a little stickier and dries much slower.  Here's the ink pad I bought at Michael's:

4.) A stamp! You don't need specialized embossing stamps, any stamp will do.  I purchased a set of alphabet stamps because I'm hoping to incorporate these stamps in other ways in my wedding:

         To get started, you need to lay down whatever paper you plan to emboss.  In this tutorial you'll see some of my practice embossing on cardstock and my final plan to emboss the envelopes. 
        I had some trouble lining up my stamps so they would be in a straight line.  I think there's a product you can buy to help you do this called Stampmajik, but I used an envelope top.   Once you've got the design, carefully ink your stamp and put it on paper. 
         Once you've stamped, the most important part is getting that still wet ink covered in embossing powder.  If it dries, the powder won't stick and won't emboss.  

       Once it's covered in powder, tilt the paper back so the excess powder falls into your embossing jar or into a plate, and wipe any stubborn powder away with a brush (I also heard a dryer sheet works too).  What remains is whatever you stamped outlined in colored powder.  But it's very delicate so be careful when brushing around it.  Then, use your new embossing gun to heat the powder (hold it about 2 inches away).  You can actually see the powder change color and set, that's when you know it's ready.  Although I haven't done it yet, be careful not to burn your paper.  Here's the word "Groom"  ready to be embossed with my embossing gun.  


            Once you've embossed the letters, you're done! It will form a smooth hard raised design.  I've also tried embossing a design a few times, meaning I did all of the steps above, and then did them all again to make the words/design darker.  It seemed to work, so don't be afraid to try.  
            Although I'm still working on how to incorporate more embossing into my wedding, here's the first DIY craft:  the back of an envelope with the embossed "S" on it for my last name.  I let the corners of the stamp get ink on them and powder, because I like the sort of "stamped" look for envelopes.  You can choose not to do that depending on how much pressure you use on the stamp pad.  Like I said, I'll do this for each wedding invitation envelope in place of a seal.  It's really easy and less expensive, plus I can use the embossing tools for other projects!


Wednesday, March 7, 2012

The Table Conversation Guest Book - Make it More Fun!

I was inspired by a picture I found on Martha Stewart's website of conversation books at each wedding table which had a question about the couple on the cover for guests to answer inside.

My Inspiration!
Martha offered some templates, but I must admit I'm not the greatest at book binding and didn't have the materials.  So, I started by printing the templates on regular paper to get an idea of the questions that were asked for each book. 

1.)    Then, I re-typed the questions, personalized some of them and changed a few.  Here is what I came up with when it was all said and done:

"what's your favorite memory of Duncan or Nicole?"

"what should we name our kids?"

"what should we do on date nights?"

"where do you see Duncan and Nicole in 20 years?"

"when did you know Duncan and Nicole were meant for each other?"

"what's the best marriage advice you've ever recieved?"

"where should the couple vacation?"

"how should the couple keep the romance alive?"

"what should the couple do during their first year of marriage?"

"what do you think makes Duncan and Nicole a good couple?"

"what are you really thinking about this wedding?"

"what is your secret to lifelong happiness?"


2.) After finalizing the questions, I set out to find someone who could make the books for me at a reasonable price.  On etsy there is someone who actually makes these exact books and binds them, but they were rather pricey at $25.00 per book.  If that's not too expensive, check them out here.

3.)  I started looking for little blank books I liked on etsy with the hope I could get someone to personalize them.  

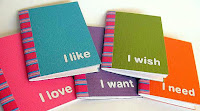
4.) I found these books by Sandra from her etsy shop called Loops and Dots.

5.)  From there, I contacted here and asked her if she could make the books I needed, and she could!

6.)  She was able to make my books in my wedding colors (least you forget they are navy, ivory and pale pink) with my personalized questions on the cover.   The total cost was $65.00 for thirteen (13) books which is one for each table. 

7.)  I plan to put little golf pencils at each table setting and ask the DJ to remind guests to write in their books! Here's the final product, enjoy!


Tuesday, March 6, 2012

Bring out that Ring! The Perfect DIY Ring Bearer Pillow Alternative!

I've been researching various options for my ring bearer.  I simply didn't want to go with the same ol' Oriental Trading Company pillow, I wanted to be different.  So, I found this picture on Martha Stewart's website: 


My inspiration!

But I didn't want to use real flowers because it was too much trouble so close to the wedding day, I wasn't sure where to find the mums that are in the picture and green isn't one of my wedding colors (pale pink, ivory  and navy are my colors).  So, I did something alittle different which used silk flowers and is in my wedding colors.


Here's how I made this pretty little thing:

1.) I started out at Michael's, a craft store, by purchasing flowers.  This time, I was really intrigued by the hydrangeas.  So, I purchased about 5 larger stem hydrangeas (they were originally $5.99 each, but there was a 50% off sale!).  Here's sort of how they looked:
2.) I also purchased a square one-inch thick piece of floral foam like this:
3.) Then, I found a single large silk peony and a package of corsage/boutonniere pins with ivory pearl tops.  I also already had the navy ribbon (see my last post) and a hot glue gun.  
4.) I first cut the corners of the styrofoam so they'd be more rounded.

5.) I had a difficult time with the hydrangeas. When they come on the stem, they don't have a stem in the middle and the leaves are held on by a sort of hook contraption.  So, I just pulled them off the hook, put a little hot glue near the center of the flower and placed it on the foam square.  But they appeared to lay very flat.  So, I pushed just the center of the flower into the foam with a little rounded stylus and then the leaves went up.  I then pierced the center with the corsage pins. 

6.)  I did this all the way around the block.  I pierced the middle of the styrofoam all the way through and ran some floral wire through it so that there was about a three inch loop on the top, and the ends on the bottom were pushed into the foam. 

7.) I took the white peony and pulled the wire loop through the center of it.  Then I secured it all with hot glue.  So, the flower now had a wire loop through the center. 

8.)  I hot glued the edges of the navy ribbon to the under leaves of the peony and ran them around the little box. 

9.) Finally, I tied ribbons to the top of the peony around the loop of the floral wire.  I made two bows, and then added two more ribbons (just knotted) which I will tie the rings on.  I did one in pink and one in blue for the bride's ring and the groom's ring respectively.

10.) Then I pushed some extra corsage pins through the top just to make it secure.

A little time consuming, but worth the effort! Hope you enjoy it!


Pretty Pretty Pomanders!

I've started this blog to encourage other brides to DIY and save a great deal of money in the process.  My first project that I want to share are my aisle pomanders "pom poms" that I plan to hang either on the seats or on shepard's hooks on the wedding aisle.  My colors are pale pink, navy and ivory, so I set about working on how to make pomanders with this inspiration.  Here is how I did it!
All done! Ten poms in all, even had different sizes!


My Inspiration!

1.) I went to Michael's, a craft store, and purchased 4 in. round foam balls (see the picture below), navy ribbon, wire cutters, a hot glue gun (I didn't have one before), and some cheap $1.00 ribbon.


2.) I started looking for flowers at Michael's and dollar stores in my area.  I was finally able to get enough flowers to make my poms, I can tell you it takes more than you think! So over-buy and then return.  Look for flowers that seem to go together and that have some height to them, that's all the advice I can give. Here are some of the flowers I used:

3.)  Once I had everything, I started by tying the cheap ribbon around the balls and securing with the hot glue.
4.)  Then, I tied the nice navy blue ribbon through cheap ribbon and left enough for me to hang the poms when I was done.  I also secured that ribbon's knot with a hot glue gun.
5.)  Then, I started by making a small hole in the ball with a golf tee (from my Fiance).  Once the hole was made, I cut a flower from the stem leaving about one inch of stem on the flower with my wire cutters. I put hot glue on the flower stem and stuck it in the hole I made.
6.)  I did this until I filled up the entire ball! I did all sorts of different designs, some of my poms are separated into sections of color, some are all mixed in, and some are lines of color.  I also got different sized flowers (mostly because I couldn't find enough of one type of flower) but they turned out great.
It's really just that simple!