Pretty little things for the wedding of my dreams...

Wednesday, May 16, 2012

A Show-stopper DIY Cupcake Topper!


It's been too long since I've blogged, and I'm hoping this do-it-yourself project isn't too easy for you! For my rehearsal dinner we are going to have cupcakes instead of cake.  This is a great idea because you don't pay a cake-cutting fee (which some venues will charge) and my guests will be having cake the very next day! So, I wanted to embellish my cupcakes with a little something special.  You can buy cupcake toppers all over the place.  On etsy you can purchase 12 cupcake toppers like the onesfor a dollar each.  But, I think I can do it for cheaper and add my own flair! So, here it goes:

1.) First gather your supplies. 
  • You will need scrapbook cardstock and/or decorative paper and cardstock backing.   I was able to use remnants from other projects for most of my cupcake toppers, so I saved tons of money on this.  I then just used spray adhesive to glue the cardstock to the back of one sheet of paper.  For one side of the cupcake topper you want cardstock, for the other side you want just nice text-weight paper.
  • A hole punch, although you can also cut the shapes yourself.  I just find hole punches to be easier and more uniform.  My circular hole punch with scalloped edges cost $7.99 on sale at Michael's.  You can use square hole punches, just make sure they are big enough - at least an inch wide.
  • I found these flat craft picks which ended up being perfect and were less expensive than lollipop sticks.  These were 250 for only $1.99 at Michael's.  I think toothpicks might be too small.
  • I purchased some raised glittery heart stickers.  You can also just purchase flat stickers and put a foam backing on them.  The raised stickers vary in price, but I bought mine during a buy one, get one 50% off sale and they were about $5.00 total.
  • I also had a hot glue gun and spray adhesive on hand. 


2.)  I started by glueing the cardstock to the back of one scrapbook page (you can also just buy decorative cardstock - I wanted to use what I already had).  Then using the hole punch to cut out the circular design in the scrapbook page with the cardstock backing.  I also cut out the circular design in the regular scrapbook paper - without the cardstock backing.

3.) Then, I used my hot glue gun to glue the cardstock to the flat top of the  craft picks.   
4.) To get a flat appearance, I sprayed the pick and the cardstock with spray adhesive.  Then placed the scrapbook  regular paper shape on top of the cardstock shape.  I made sure to match up the scallops of the cardstock paper and the regular paper.
                                             
5.)  Next, I attached the stickers.  I used hot glue if I attached the sticker to the scrapbook paper side because it was a little raised.

6.) And that's all! You can print words out and attach them, or different shapes or stickers for any occasion!  Here's the final product - just imagine these on top of cupcakes!


Monday, April 23, 2012

DECOUPAGING TREASURE: Using my Old Wedding Magazines to Make a Keepsake/Memory Box

            Like most brides-to-be, I've accumulated a great deal of bridal magazines and felt so guilty when I went to throw them away.  So, I decided to use them somehow.  I came up with the idea to make a bridal keepsake box because I've already started gathering little memories like my bridal shower invitations.  Regular bridal keepsake boxes run about $50.00 and up. This one from Pottery Barn is priced at $60.00:
Click here to View the Website
         Instead of spending that much, I came up with my version which will cost you around $20.00 or so, depending on what you have available and what you want.  Here's how I did it:

1.)  I started by purchasing an oval kraft box at Michael's for $12.99 and decoupage medium for about $6.00.  You can also use modpodge, and that might run you a little more.

2.) Then I collected all those bridal magazines and began to carefully cut out pictures for my box.  I'm lucky my bridal magazines were not ferociously attacked by a roving beast in my house:
3.)  When you cut the pictures out, try to do your best to be as detailed as possible and pick pictures/shapes that can stand alone without the background.  I tried to pick words, phrases, colors, flowers and more that reminded me of my wedding. I also cut out some raised flowers from some scrapbook paper I had.
4.) Next, I took the top of my box and laid the pictures on it (don't use any glue or medium just yet), get a good idea of how you want it to look first.  You can paint the box before you decoupage, but I chose not to do that.
5.)  After I'd placed the pictures, I started by using a sponge brush and glued down each picture on the box top with the medium.  After the medium dried, I did about 10 coats of decoupage material on top of the glued pictures.  Each time I waited until the medium had dried completely before doing my next coat.  Here's a close-up of the top of the box, you can see that I layered pictures on it which is completely your preference.
 6.) On the last coat, I moistened my brush with water and made sure everything was completely dry before spraying the top down with mod podge sealer (do this outside).  I have heard that you don't need mod podge sealer because the medium seals itself, but I had it in my house so I just did it.

7.) Next, I turned to the bottom of the box.  I could have also decoupaged this part, but thought it would be cool to make it different.  I started by painting the bottom a light blue with some acrylic paint I already had.
8.) Then, I decided to stencil a design on the bottom of the box.  To do this, I made sure the light blue paint was completely dry.  I then taped my stencil to the box.  Be sure you are using stencil tape and that it's exactly where you wanted.
9.) Next, I had some extra deep blue paint from the table numbers I painted.  So, I carefully blotted the paint on the stencil in an up/down motion with a sponge brush.
10.)  After it dried, I peeled the stencil off and had a pretty tree which I also sprayed with Mod Podge sealer.
11.) Here's a few pictures of the final product! I plan to store all sorts of wedding things in here from the bouquet charm I ordered to my invitations.  


Monday, April 16, 2012

Ravishing DIY "Reserved" Signs for the Ceremony!

This is a smaller project and significantly easier.  But, it's actually something you need for the wedding.  During the ceremony, most weddings require that the first few rows of chairs be reserved for family and/or those participating in the processional.  For instance, my grandmother is going to walk down the aisle, but she's not standing for the whole ceremony.  So, i need a place for her to sit when she's completed her processional.   If you don't reserve seats, you'll get guests sitting everywhere! So, I came up with a way to make a very low-cost sign to reserve chairs during the ceremony. 

1.)  First, I started with my handy dandy embossing kit (I told you I wanted to find more ways to incorporate it into the wedding).   You'll also need a stamp and/or letter stamps.  I found a stamp with the word "reserved" on it online for about $6.00 and these sort of medium size gift tags from Michael's (see below) for about $2.00.  I'm sure you could also just spell out a word with the letter stamps from Michael's.   
2.) So, I started by heat embossing each tag with the word "reserved".  To do that, you use your stamp in embossing ink and stamp on the tags. 

3.) Then cover the wet ink with the embossing powder.
4.)  Next, tap the excess powder off and you'll have the word nicely remaining on the tag.
5.) Then use your embossing tool to heat the powder so it melts and creates a gorgeous raised effect.
6.)  I wanted to do something different for the back, but you could easily just emboss the back of the tags as well.  I think I might have over-complicated this because I later learned there is actually glitter spray (which I didn't use). Anyways,  here's what I did, but feel free to make this easier.  
7.)   I had spray adhesive and glitter available to me.
8.)  I sprayed the back of each card with the adhesive and kept the bottle far enough away from the card so that it wasn't wet and looked more misted. 
9.) Then I spread glitter all over the card.

10.)  After that I laid the cards, sprayed a little shellac on them and let them dry.  However, one of them fell on the ground and that's when a terror hit the project.

The carnage after the attack.
11.)  Then I had only 9 cards :(. I strung navy blue ribbon through the tags to hang from the chairs.  They look like this when done (the ribbons were a $1.00 per spool and I only needed 2 spools):
12.)  Here's how I plan to use them on the chivari chairs I have for the ceremony.  It's so cheap and easy! You'd be spending a lot more on etsy and this is something even the most craft-challenged indivdual can do!

Monday, April 9, 2012

Painting by the Numbers (Navy Blue Painted Table Numbers for my Wedding)

I need wedding reception table names or numbers, everyone knows that.  But, finding the right ones in the right colors (my wedding colors are navy blue and pale pink) proved more difficult than expected.  I thought about tables named after golf courses, or doing places my fiance and I had been, but I just couldn't get it figured out.  So, I settled on doing table numbers, boring right? Not really because I plan to call them "pins" or "holes" on the seating chart to make reference to our subtle golf theme, and I found some gorgeous options.  I finally settled on the following numbers I found on etsy.com in Frank's Crafts Store.  The price was $60.00, plus shipping:  http://www.etsy.com/listing/90459663/table-numbers-10-34-tall-with-base-set-1
The table numbers!
I think the shop's owner is willing to paint the numbers, but I thought I'd give it a try (since it looks like painted numbers run about $120.00).   So, here's how I painted the table numbers navy to match my wedding color theme.

1.) First, the numbers and stands are separate pieces, come wrapped up and are made of a sort of particle board. So, I got them all out and began to prepare them separately.


2.) I started by sanding the numbers down.
3.) I then cleaned the numbers with soap and water. From there, I used a sealer ($4.00) I bought at Michael's to seal the numbers first which will allow the paint to go smoother and closes up the pores of the wood.  Here's a picture of the sealer and the sponge brush ($0.49) I used (I tried a regular painting brush but it didn't work as well to get a smooth finish).   
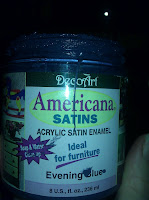
 4.)  After the sealer dried, I sanded the numbers again lightly and washed them off again.  Then I started with the paint I got on sale at Michael's for about $3.00.  Here's what I used:
American Satin in Evening Blue
5.) I painted the numbers standing in their stands making sure to get in the little crevices of the numbers.  I'm sure you could use spray paint too, but I think this worked well because of the way the numbers are shaped. 
6.)  After the numbers dried, I decided I wanted to make sure that the paint had a deeper colored look to them and so I wanted to add a second coat.  I sanded the numbers down one last time, you can see how they look after I sanded them below:

7.)  Then I painted them one more time and let them dry. 
8.)  I finished the numbers off with a coat of shellac spray (be sure to spray outside and on cardboard backer). 

9.)  I did the same technique for the stands and I now have my final product! Hope you like:


Tuesday, March 27, 2012

Charming Crowns (Stefana) for the Wedding Ceremony

As part of our ceremony, I decided to incorporate a crowning ceremony to recognize my fiance's Armenian heritage.   During the ceremony, weddings crowns are placed upon the heads of bridegroom and the bride.  Crowns worn by bride and groom are symbols of their own little kingdom or home.  Although our ceremony is going to be secular, I modified the ceremony as such to still incorporate the crowning.  However, to do all this I will need crowns! 

In the Greek tradition, the crowns are called "Stefana" and very common.  They can be made of metal, wood, ribbons and pearls.  Usually they are connected in the back with a long ribbon.  I began my search online and came upon some examples:

This one is available for 190 Euros here.


This one is available for $72.00 here.


This one is available for $175.00 here.
As you can see, these crowns are NOT cheap! So, I decided to make my own and there really were not many ideas online.  I found a tutorial for making a Christmas ornament out of an embroidery hoop and that's what gave me the idea for this project. 

1.) I purchased two embroidery hoops (about $1.25 per hoop), and you should see which fits your head best. 

I also purchased ribbon from Michael's which I got on sale for $1.00 per spool, make sure you have at least 8 yards of your first layer of ribbon.  Any additional layer of ribbon can come in 6 yards or less, depending how you wrap.  Here are the ribbons I used for the second and third layers ($1.00 each!):


I already had little pearl adhesive stickers from Michael's and a hot glue gun. 

2.) Then, I separated the inner part of the embroidery hoop (took off the part with the metal latch and kept the inside hoop with no latch). 
3.) For both crowns, I used only the inside hoop (no latch).  I began to slowly wrap the hoop in ribbon.  I put just a small line of hot glue on the inside of the hoop (no more than an inch)  because hot glue dries quickly.  Then, I slowly wrapped my first layer of ribbon on top of the glue, and made each piece of ribbon overlap. 

4.) After I completely wrapped each crown with my base layer ribbon.  I began to add some sparkly metallic ribbon in larger circles using the same method of glueing as before.

5.) When I was finished I had wrapped the crown completely with three different ribbons, two of which (the sparkly ones) were sort of intertwined (see below).  There was excess ribbon hanging off a small portion of the crown as well.

6.)  Then, I set about making the back bow and the ribbon connecting the two crowns.  First, I took the ribbon I wanted to use to connect the two crowns and glued one end to the inside of the crown at the same point where I had excess ribbon.
7.)  Then I took the excess ribbon which was hanging off the crowns (it was not the base layer, but one of the sparkly layers).  I glued it into a bow. The picture below isn't the greatest, but you should be able to see the connecting ribbon glued into the inside and the bow on the outside of the crown.
8.) I then pulled one of the sparkly ribbons over the front of the glued bow (like the knot) and I had an almost finished product.  I decided to add some embellishments by glueing on the little adhesive pearls I had around the crown and on the bow.  


9.) Here's what I came up with for a total of about $5.00 (depends on if you have the glue gun/glue and stickers).